By the end of this article, you’re going to learn how to design your racing bibs to:
* Customize your Racing Bibs exactly the way you want it.
* Save time: Real time proofing, no waiting for your designer’s proof.
* Save you money on design charges if you were to hire someone to design your racing bibs.
COLOR RIGHT NOW ARE EXPERTS IN HELPING OUR CLIENTS WITH DESIGN.
Check out our many posts on how to design your own print materials using several different free online software available to the public. Be a part of the new online community of designers of print media using our fast and easy 7 step process.
WHY WE CHOSE CANVA AND GOOGLE SHEETS
There are over 30 free online software for design purposes and we have tested all and have chosen Canva and Google Sheets as one of our top recommended softwares for these three reasons.
* Canva makes graphic design simple and accessible.
* Unlike other software, Canva and Google Sheets is user friendly and very intuitive.
* With Canva drag and drop features, it is very easy to use.
GETTING STARTED
You will have to have Canva and Google account to start designing. The software is free or both, click Canva account and Google account
General Note: It helps to provide an excel/google sheet with names and numbers to whom ever you are getting it printed from.
STEP 1: START A NEW PROJECT
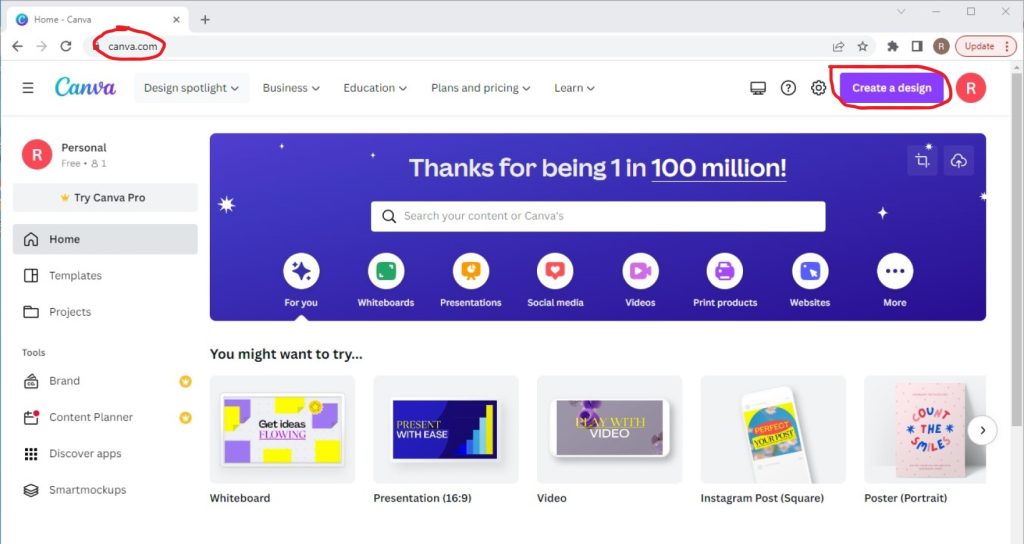
Canva has many different design templates. They do not have Running Bibs as a template. Need to design this project from scratch. In order to do so, in sign to Canva, then in the top right corner there is a ” Create a design” button. Select it.
Tip For Best results:
- The standard size is 6 inches by 9 inches, and there are 0.25 inches circle-cut on all 4 corners.
STEP 2: SEARCH A TEMPLATE
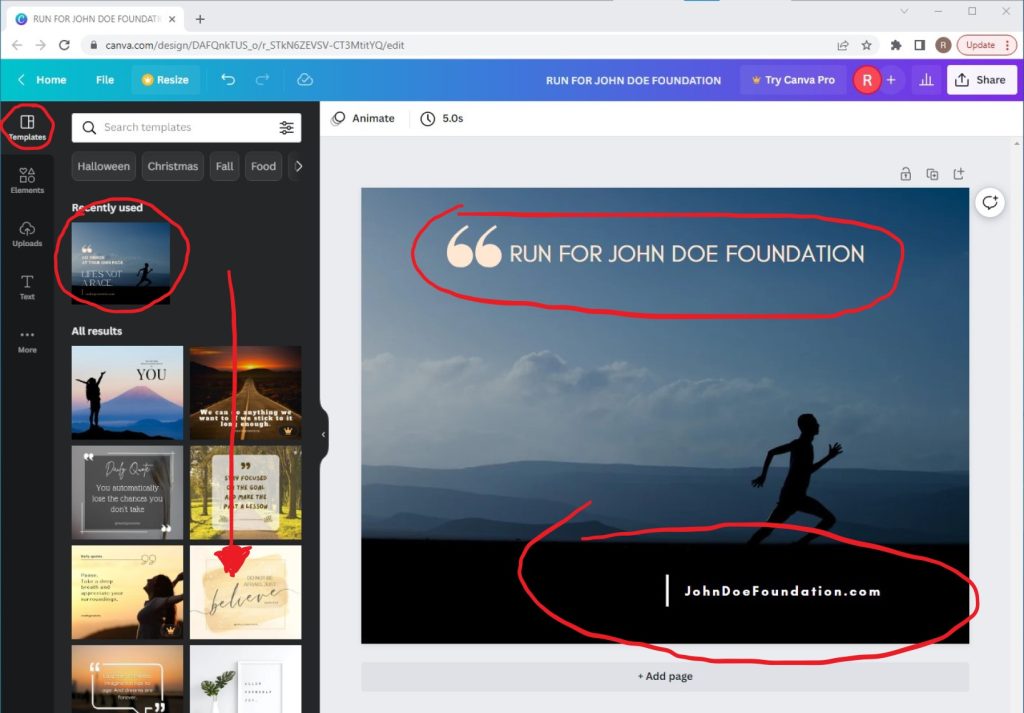
Many different design templates to choose from. But if the design is a racing bib, it needs a theme with running or racing in it. to find these templates, go to:
- Templates
- Type in the search bar “Running”
- then in all results, templates will pop up
- select one by double-clicking
Tip For Best results:
- Once you select a template, you can edit/change the type or the colors, just remember to mind your spacing and leave room for the name and number area to the center of the racing bib
STEP 3: USE GOOGLE SHEETS FOR NUMBERS AND NAMES
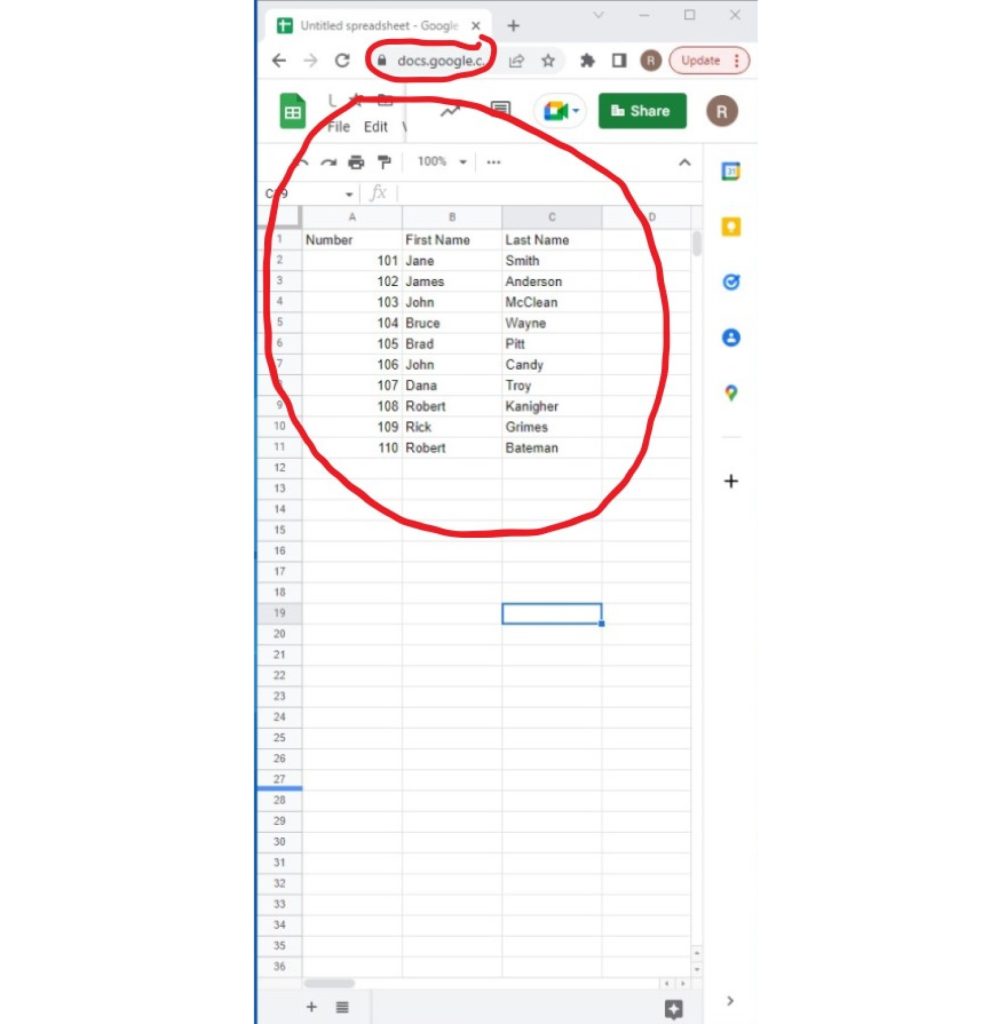
If you’re getting these sent out to print. An excel sheet saved with the names and numbers of the racers. Is needed to be provide as one of the files. Google Sheets works the same as Microsoft Excel.
See the example on an image, have titles (Number/ First Name/ Last Name).
Tip For Best results:
- Remember to save/download the file type as “Comma Separated Values (.csv)”
STEP 4: TYPE DESIGN
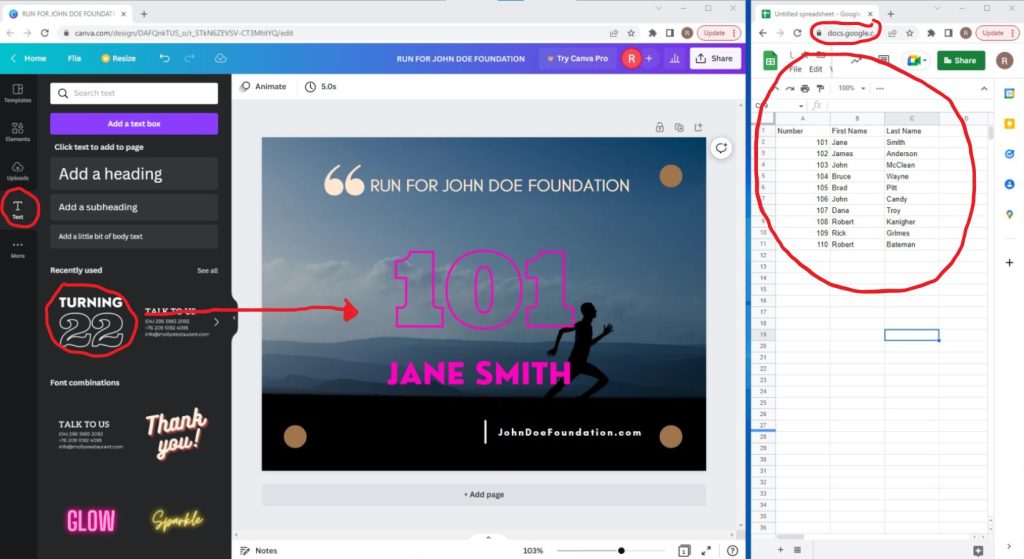
To get an idea of how the racing will look like. Here are some steps you can take to add type to the Racing Bib.
Go to the “Text” tab on the left-hand corner. Open the tab there will be many different options/styles (example: “TURNING 22” STYLE). Double-click on the artboard, then start changing the Racing Bib design.
Note: the Number and Name are a place and style holders for the print company, save one file with the name and number and the other without.
Tip For Best results:
- As for the Racing Bibs Design, the standard is the top is always “number” and bottom is always “name” to be placed
STEP 5: DYECUT OR CUT OUTS
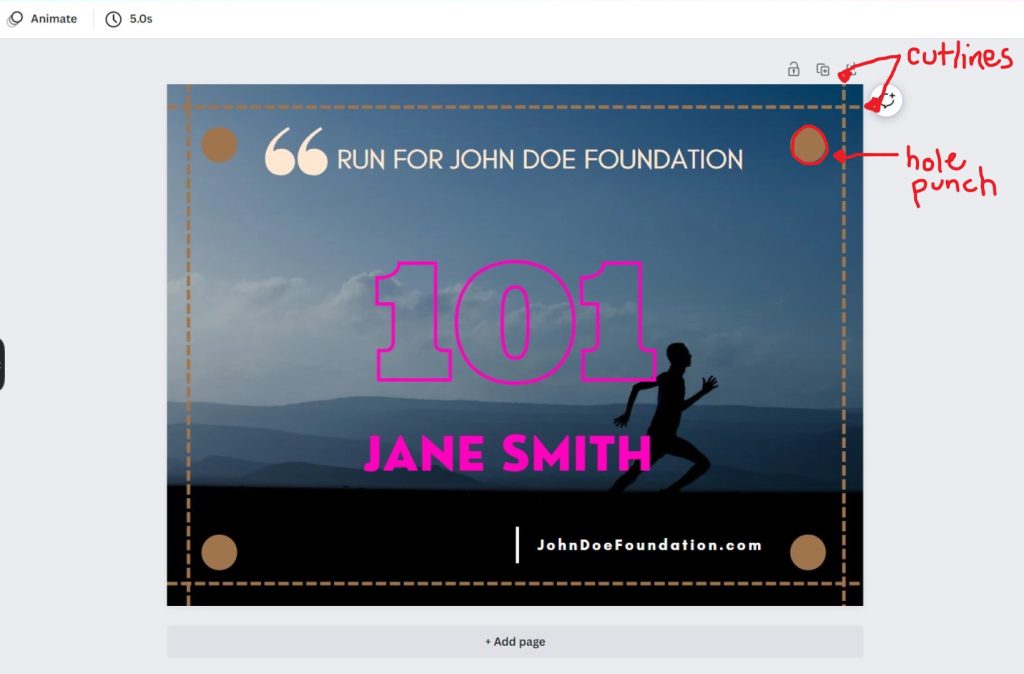
This image/template is to show you where the cut line and the holes punches are going to be with a racing bib. they are colored brown, so keep in mind when you do a design, to make sure no text or important design does not go near through cutline or hole punches. This is standard for all racing bibs.
Tips For Best results:
- The circle are usually 0.25 inches around, and the dye-lines are 0.125 inches around. To keep in mind of spacing for your design.
- Do not save the dye-cut and circle on your design, this is just for show!
STEP 6: SAVE AND DOWNLOAD YOUR FILE
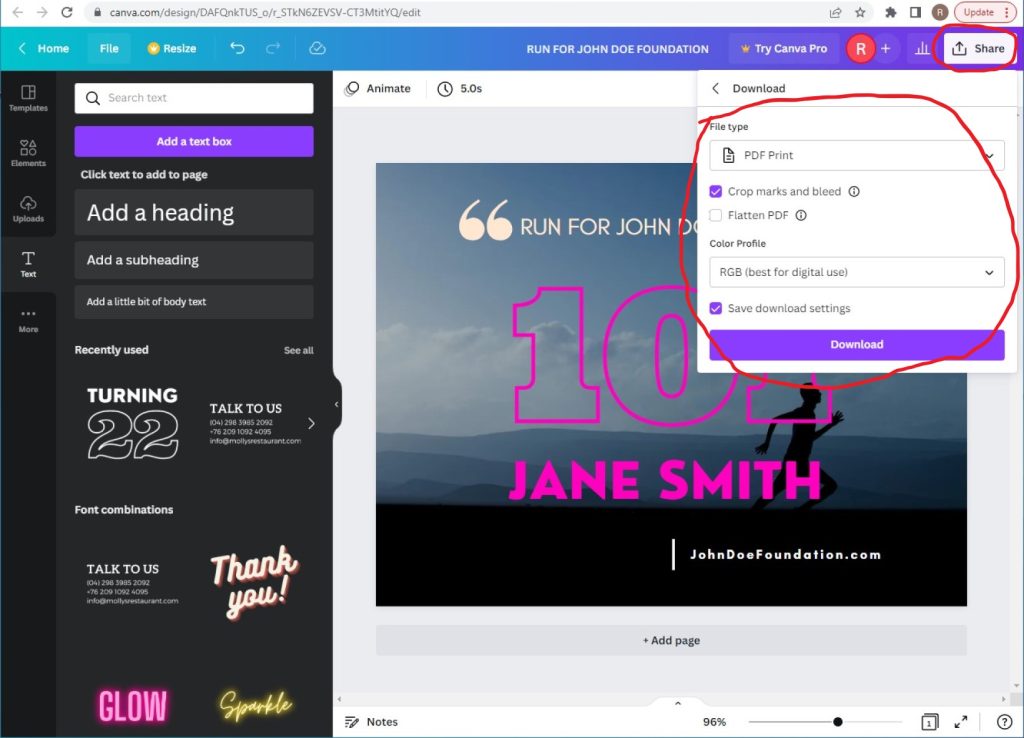
Now that you’ve finished designing your Racing Bibs, all you need to do is save it in the correct format and send it off to us when you place your order. Follow the steps below to make sure your design comes to us ready for printing!
- Click the “Share” button at the top right of your screen
- Click “Download” from the drop-down menu that appears
- Select “PDF Print” under “File Type”
- Check “Crop marks and bleeds”
- Hit the “Download” button at the bottom, and save your file to your computer
NOTE: Save two different files:
- With Name and Number (show would you want the information to look)
- Without Name and Number
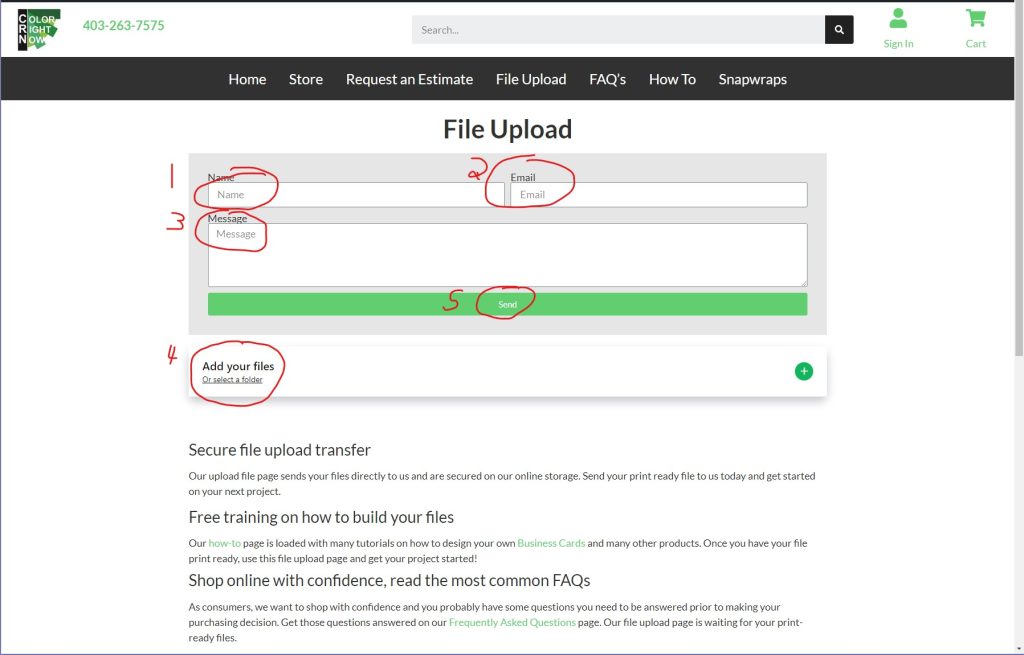
STEP 7: SEND US YOUR FILE TO PRINT
It’s now time to get your design printed putting ink on paper!
Send us your file and we will get started today!
EASY AND FREE, THAT IS HOW TO DESIGN A RACING BIB USING CANVA AND GOOGLE SHEETS
Feel free to leave comments about this tutorial on our homepage located at the bottom
DO YOU HAVE DESIGNING QUESTIONS?
This is an easy 5 step quick process to help you design your on art. You may have some unanswered design questions, see our Frequently Asked Questions page for many helpful tips.

