By the end of this article, you’re going to learn how to design your banner stand to:
* Customize your banner exactly the way you want it.
* Save time: Real time proofing, no waiting for your designer’s proof.
* Save you money on design charges if you were to hire someone to design your banner.
COLOR RIGHT NOW ARE EXPERTS IN HELPING OUR CLIENTS WITH DESIGN.
Check out our many posts on how to design your own print materials using several different free online software available to the public. Be a part of the new online community of designers of print media using our fast and easy 5 step process.
WHY WE CHOSE GRAVIT DESIGNER
There are over 30 free online software for design purposes and we have tested all and have chosen Gravit Designer as one of our top recommended softwares for these three reasons.
* Gravit Designer makes graphic design simple and accessible.
* Unlike other software, Gravit Designer is user friendly and very intuitive.
* With Gravit Designer drag and drop features, it is very easy to use.
GETTING STARTED
You will have to download Gravit Designer to start designing. The software is free, click here to make your Gravit Designer account.

STEP 1: START A NEW PROJECT AND SETTING THE SIZE
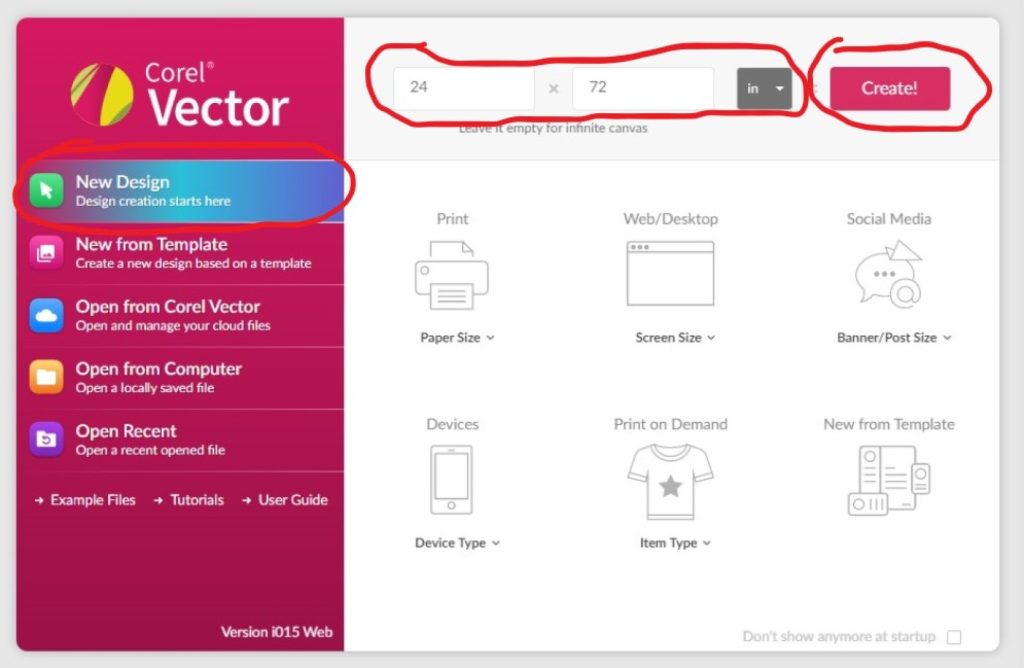
Open Gravit Designer and click on the “New Document” button in the start screen. Next, select the “New Design”, fill in the size of the banner. A banner is 31.5 inches by 80 inches. Customizing the size of a banner is essential to ensure that it effectively serves its purpose, fits the space where it will be displayed, and provides the desired image quality.
When customizing the size of your banner, it’s important to consider the printing options that are available to you to ensure that you achieve the desired result.
Tips For Best results:
- First consideration when customizing the size of your banner should be the purpose of the design. For example, a banner stand may be appropriate for a trade show or event display, but it may not be the best size for smaller products
- Next consideration when customizing the size of your banner should be the available space where it will be displayed. A 6ft banner may be too large for a small room or too small for a large hall, so it’s important to consider the available space when determining the size of your banner.
STEP 2: ALL THE TOOLS FOR DESIGN
Gravit Designer does have so many different design element to customize your 6ft Rollup Banner. Here are a couple of opinions.
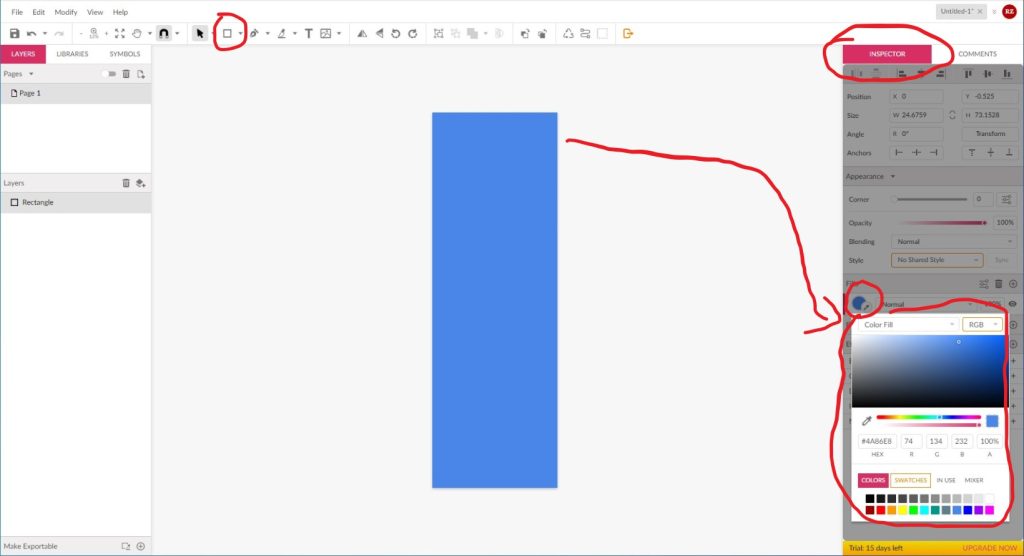
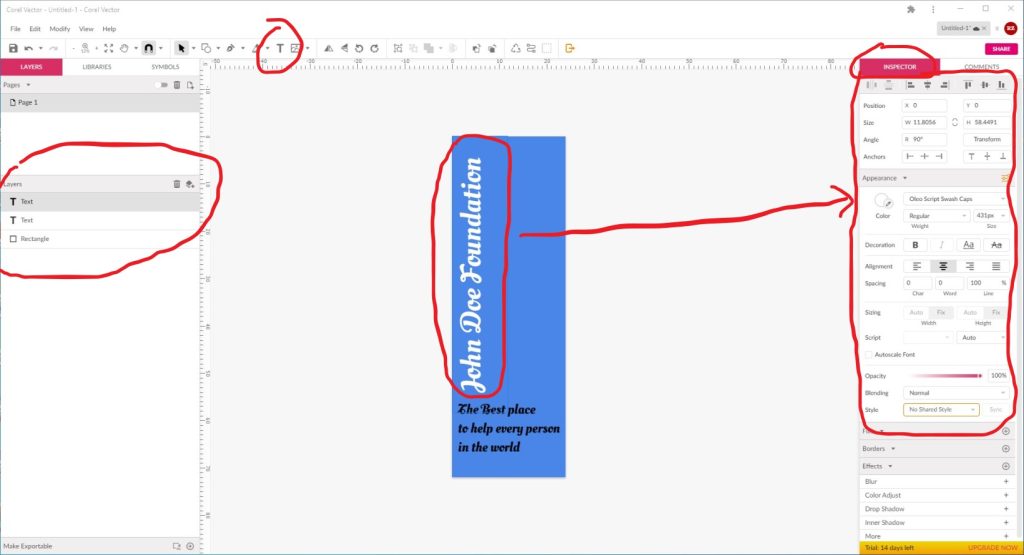
- Choose the Background Color The background color sets the tone for your banner design. To change the background color, go to the “Inspector” panel, click on the “Fill” option, and select the color you want. If you prefer, you can also choose an image or pattern as the background. Add the text and style to Banner Now it’s time to add text to your banner!
- Gravit Designer offers a range of font options, so choose one that fits the style of your banner. To add text, go to the “Text” tool in the toolbar, select the area where you want the text to appear, and start typing. You can also change the font size, color, and style in the “Inspector” panel. You can choose any font and color for the text, and adjust its size and position as needed.
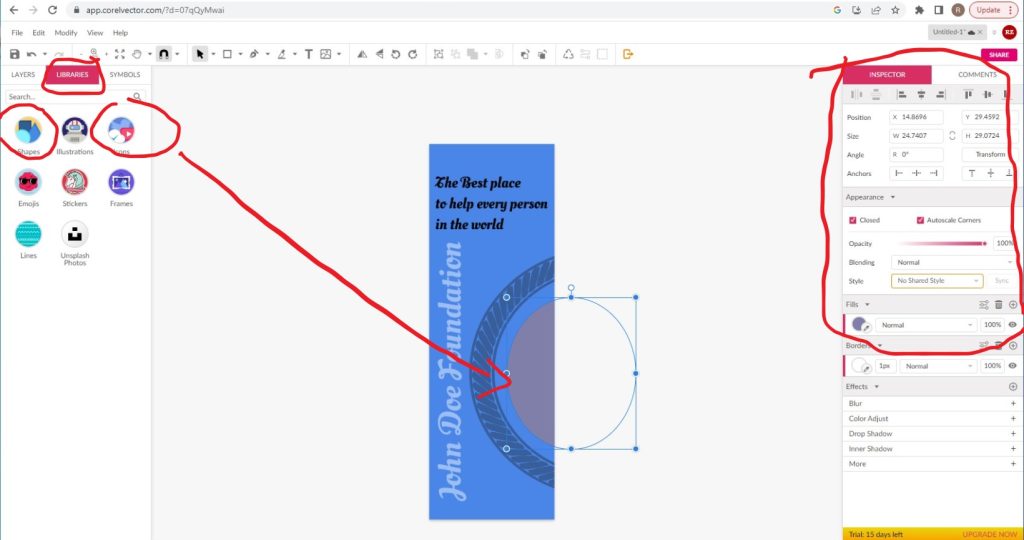
- To add an Graphics, go to the “Libraries” option in the toolbar and select: shapes, Illustrations, Icons, Emojis, Stickers, Frames, and Lines you want to use. You can also create graphics using the “Shape” tool or the “Pen” tool as well in Gravit Designer.
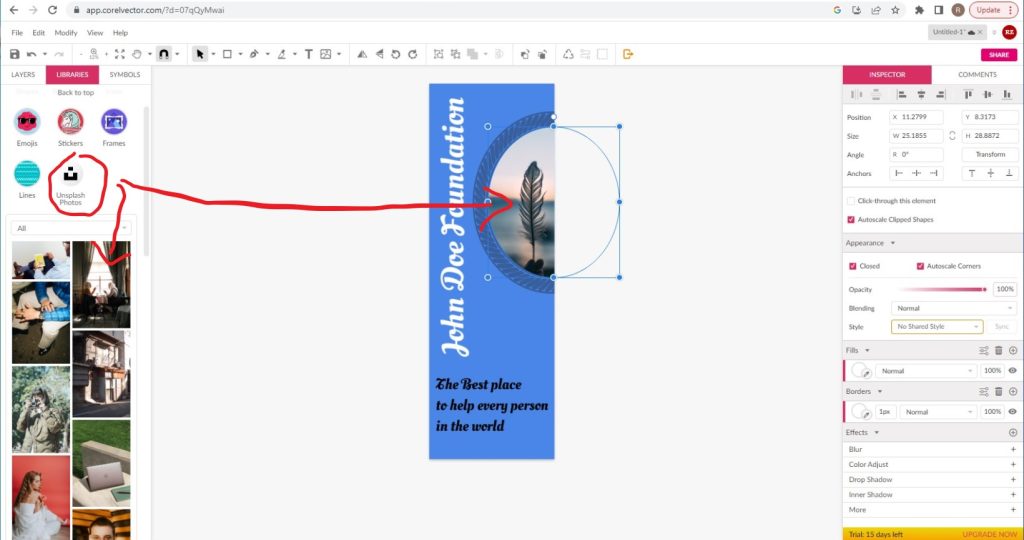
- To add an image to your banner, go to the “Import” option in the toolbar and select the image you want to use. Gravit Designer supports a range of image formats, including PNG, JPG, and SVG. Once you have imported the image, you can place it anywhere on the canvas
In conclusion, adding graphics to your banner design in Gravit Designer is easy and straightforward. With its range of tools and options, you can create eye-catching banners that are sure to stand out. Where to get images in Gravit Designer for your banner Import the Image.
Tips For Best results:
- There is a layer section of the left-bar. This can be handy if you want to arrange and layer your text, to have some artistic typography design. Now the fun part, it’s all about the Graphics and Images Graphics and images can help make your banner stand out.
- The “Shape” tool to create simple geometric shapes like rectangles, circles, and triangles. You can also use the “Pen” tool to create more complex shapes and designs. Add Text to the Graphics If you want to add text to your image, go to the “Text” tool in the toolbar and select the area where you want the text to appear. You can choose any font and color for the text, and adjust its size and position as needed.
- Resize and Position the Image. Once you have added the image to your banner, you may need to resize it to fit the design. To do this, select the image and use the handles on the edges to resize it as desired. You can also use the “Inspector” panel to adjust the size of the image.
STEP 3: EDIT THE ALIGNMENT
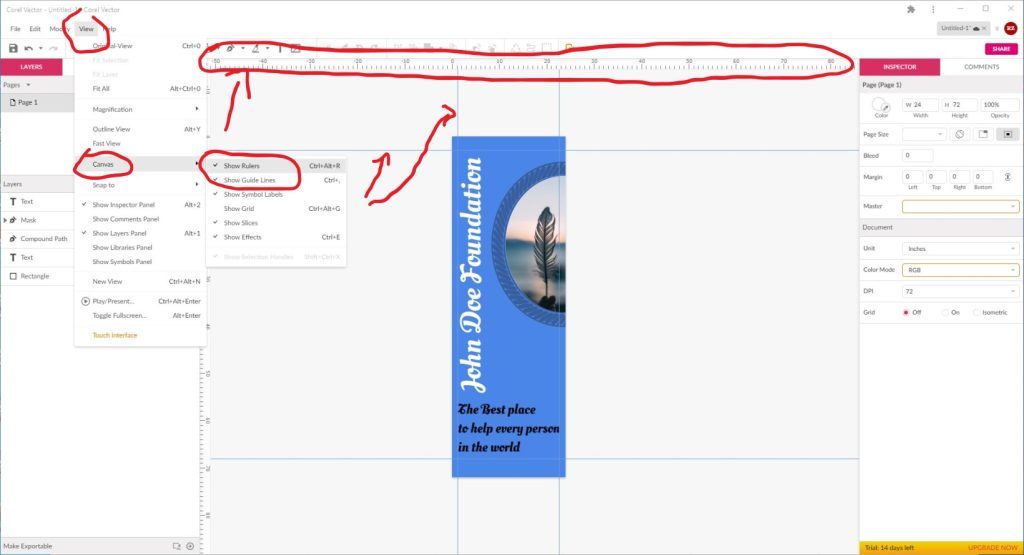
In Gravit Designer, you can control the spacing between elements by opening the guidelines and rulers. To do this, go to “View”, then click “Canvas”, the click “Show Rules”. To use the rulers and guidelines, just click and drag the guideline out (as shown with the blue lines). As for a banner it is good to keep 3 inches from the top and bottom away from important information, because depending on the banner stand you use, they will need that space to hook the banner to the banner stand to.
Here’s why spacing is important in banner design:
- Improves readability: By adding appropriate spacing between elements, such as text and images, you can improve the readability of your banner. This makes it easier for people to quickly scan and understand the information on the banner.
- Creates balance: Proper spacing can help create a balanced and harmonious design. For example, if you have multiple elements on the banner, adding equal spacing between them can make the design look more organized and aesthetically pleasing.
- Helps finish they final product: When you use great spacing awareness, it helps so no important information get cut off, when it come to printing the final banner design.
STEP 4: SAVE AND DOWNLOAD YOUR FILE
Now that you’ve finished designing your banner, all you need to do is save it in the correct format and send it off to us when you place your order. Follow the steps below to make sure your design comes to us ready for printing!
Tips For Best results:
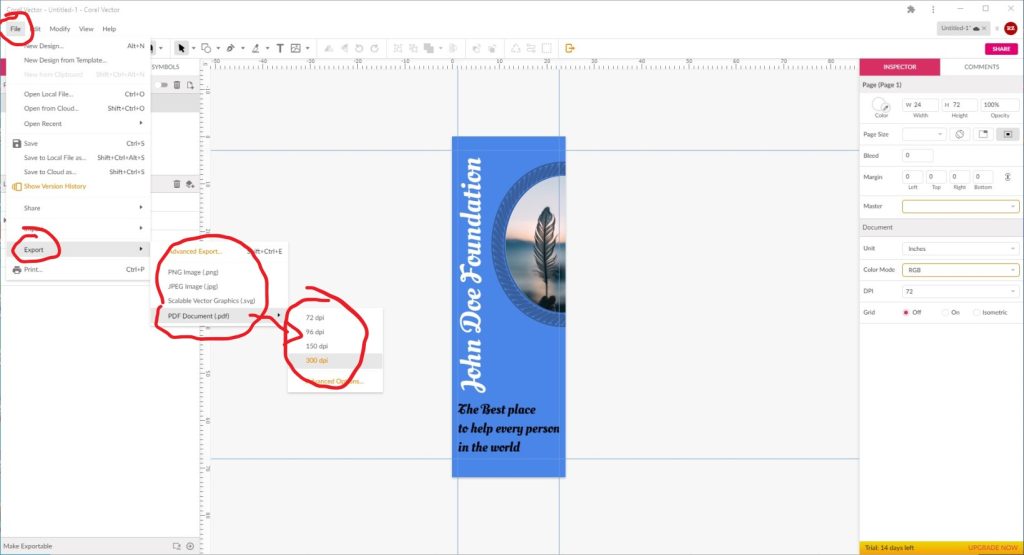
- Click the “File” button at the top left of your screen
- Click “Export” from the drop-down menu that appears
- Select “PDF Document”
- Save at 300 DPI
- Save your file to your computer
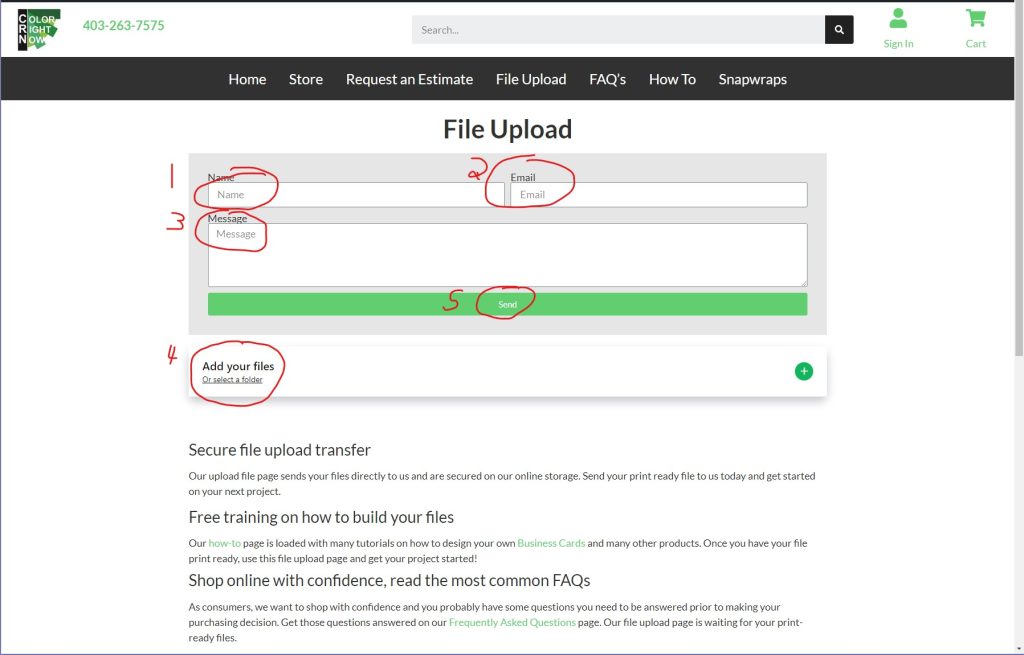
STEP 5: SEND US YOUR FILE TO PRINT
It’s now time to get your design printed putting ink on paper!
Send us your file and we will get started today!
EASY AND FREE, THAT IS HOW TO DESIGN A BANNER STAND USING GRAVIT DESIGNER
Feel free to leave comments about this tutorial on our homepage located at the bottom
DO YOU HAVE DESIGNING QUESTIONS?
This is an easy 5 step quick process to help you design your on art. You may have some unanswered design questions, see our Frequently Asked Questions page for many helpful tips.